
SOLIDWORKS PDM Standard and PDM Professional are the main Product Data Management tools available in the SOLIDWORKS 2018 product suite. Much like the core SOLIDWORKS 3D CAD software, these tools offer a user-friendly interface combined with some powerful options for enabling easy file control.
In this video Elite Applications Engineer, Adam Rose, will give you a guided tour of the SOLIDWORKS PDM user interface as seen from Windows Explorer.
Video: Getting started with the SOLIDWORKS PDM User Interface
[Video transcript below]
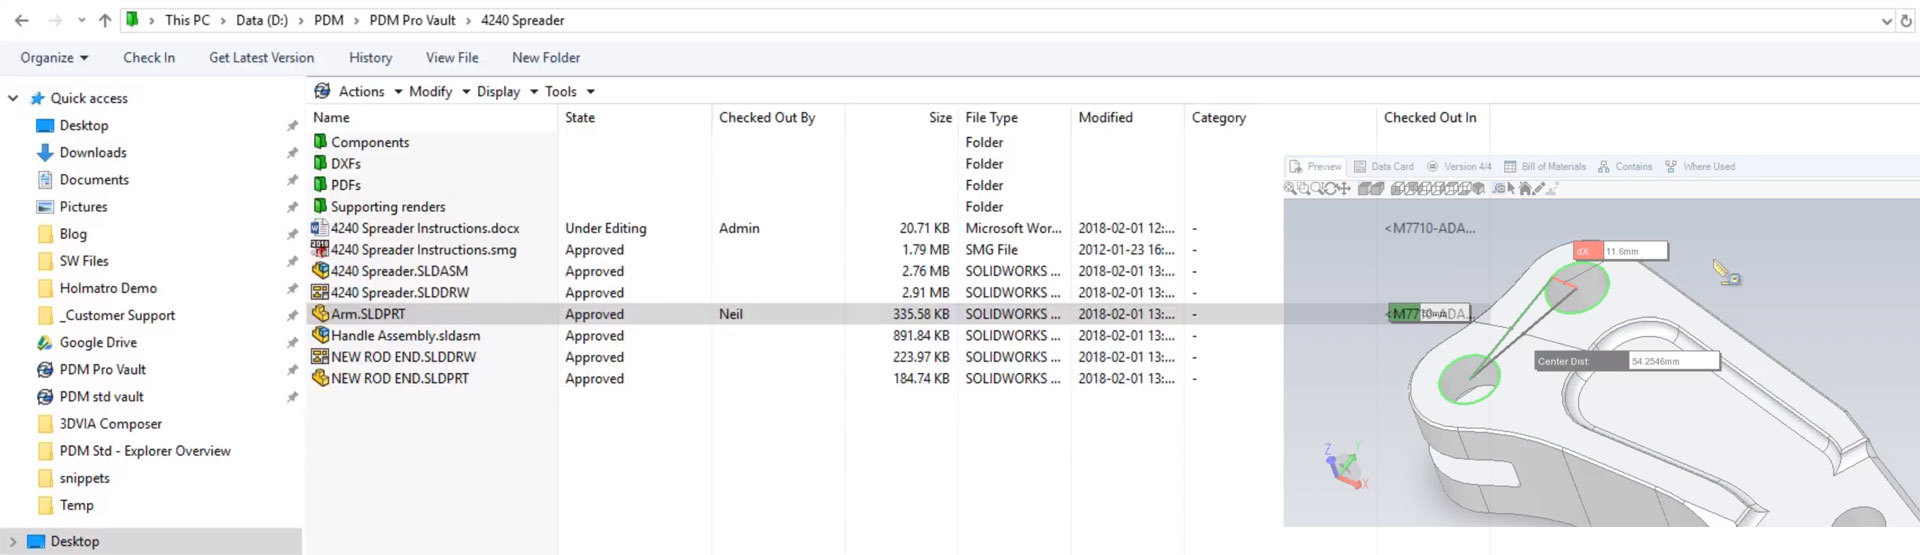
We start by having a look inside our local view where there are three main areas of the interface; The tabs at the bottom, the folders and files areas and the main toolbar at the top, where we have most of the tools. We can also access the search bar on the top right, which is an expansive tool for searching your vault based on a number of criteria.
The Actions menu contains fairly typical PDM options: Things like ‘Check in’, ‘Check out’ and the ability to get versions (make sure a file is selected first to perform these options!).
‘Modify’ gives you the ability to set the revision number on a file, or change the workflow state a file sits in. We can also use the options here to create references between unrelated documents. First copy a file, then select a second “checked-out” file and ‘Paste as a Reference’.
The display menu will change the look of your PDM interface. Scrolling down to the options here, there’s a number of things I’d recommend turning on. ‘Show full UI in SOLIDWORKS preview’, which gives you things like the measure tool in your preview pane. I’d also recommend ‘Select full row’, which makes reading file information across columns easier. Turning on ‘Show bitmap of SOLIDWORKS files’ will make the preview pane quicker to load while browsing your file vault.
Moving on, the ‘Tools’ menu provides access to your PDM inbox and the administration tool. We also have access to ‘Copy tree’, which is much like ‘Pack and go’, but specific to SOLIDWORKS PDM.
The files and folders area displays green folders in PDM, so we can easily differentiate the PDM system from the rest of Windows. Before I move on, if you’re not seeing the full interface here, your folders may be hidden. Simply drag the divider just below the top menu to show them again.
I would also recommend changing the folder view here, right click and go to view, then choose ‘Details’. This allows us to see the column layout, which is specific to the PDM system. These columns can be reordered by dragging them left or right. In this area we also have an extended right click menu, with PDM-specific options.
There are a series of tabs at the bottom of the PDM interface, these are your main source of information, and are where the metadata of the PDM system is presented to the user.
Let’s start on the ‘Preview’ tab. From here we can take a look at the model selected. To activate this area, simply click on the picture of our design. This will activate an eDrawings preview and (just like the main eDrawings program) we can rotate the model from here. All your controls are very similar to SOLIDWORKS; Click and drag to rotate, scroll to zoom etc. You can also measure the model from here, which can be used to evaluate design sizes by clicking on the edges of our design.
Next…the data card. This is the bespoke card which provides an overview of the custom properties inside your models, you will usually have to check files out of the system to be able to change this information. To do this, right click on your file and chose ‘Check-out’. Now fill this card in, but remember to click the save icon once you’re done filling out information!
The ‘Next’ tab shows version information. SOLIDWORKS PDM automatically creates a version after modification of a file – usually when you check-in or change state on your document. By comparing the local version to the latest version, you can work out if the files on your PC are out of date. This information can also be viewed just by looking at the tab name, even if you’re on a different tab.
Moving on, The ‘Bill of Materials’ tab will display a BOM/component list with columns customised to your Vault or user group. There are plenty of options here. Probably one of the most useful is the ‘Compare’ tool, which is selected from the top right. This tool allows you to compare the local version of your Bill of Materials to earlier versions contained inside SOLIDWORKS PDM. The Key in the bottom right indicates new, modified and deleted files. It’s a really useful for getting a quick impression of what’s been changed inside your assembly.
The ‘Contains’ and ‘Where used’ tabs are very similar, ‘Contains’ shows the components inside your Assembly or drawing. ‘Where used’ will show you references going the other way – i.e. if your Component is used in any assemblies, or drawings. The options at the top right allow you to inspect other versions of your file, as well as alternative configurations.
Whether you are running SOLIDWORKS PDM Standard or Professional, you have an expansive Product Data Management tool with loads of options at your disposal. If you aren’t using SOLIDWORKS PDM already, make sure to get in contact with us for more information on product features and pricing.


