

This blog post came from a customer asking a question about the colours on his drawings and in particular the use of this button on the Line Format toolbar.
 Beyond reading the tooltip to them we couldn’t give them a succinct description of how the button worked so we thought we’d write it down!
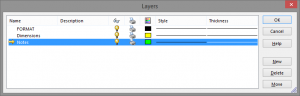
Many customers when they first start with SOLIDWORKS have a design office drawing standard that states that specific items must appear in specific colours and so their SOLIDWORKS template needs to be customised to use coloured layers. This can be done by clicking on the layers button , then adding new layers by clicking the ‘New’ button and entering a name followed by defining their colours by clicking on the colour block and choosing the preferred colour.
In the example below we have added a Yellow layer titled Dimensions and a Green layer titled Notes:
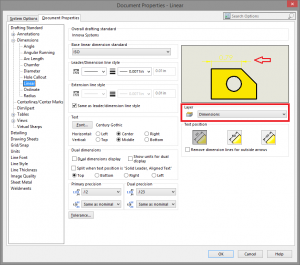
Once the layers have been created individual document items can be assigned to them. Open up the ‘Options’ dialog and click on the ‘Document Properties’, browse to the chosen drawing item and choose the layer it needs to appear on.
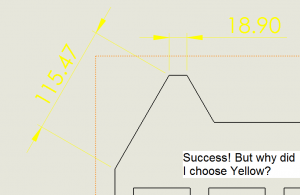
Here we have set Linear Dimensions to appear on the Dimensions layer. The preview has updated to show the example dimension in yellow:
Now we have linked our linear dimensions to the Dimensions layer within our Innova Systems drafting standard, there is one final (and easy to forget) step. We have to tell SOLIDWORKS to use the drafting standard settings.
Click the ‘Change Layer’ button and then select the ‘-Per Standard-‘ option as in the image below:
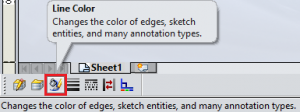
This method is obviously quicker in the long run than manually recolouring each dimension or note, however, it is necessary to colour a single drawing item either for clarity or in order to highlight it. This can be done by selecting the object and clicking the ‘Line Color’ button, then choosing the required colour:
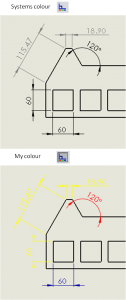
So now we have colour all over our drawing, what on earth does this have to do with our original ‘Color Display Mode’ button?
Clicking this button toggles all of the colour back to the defined system colour settings which can be found via Options > System Settings > Colors. Meaning that by default all of our manually added dimensions will appear grey, all of the model item dimensions will appear black and all of the design table dimensions will appear pink. Unselecting the button will then reshow the colours we have defined via our drafting standard or added separately. This would give the results below:
So our succinct answer to the question “What does this toggle button do?” is:
It switches between the user’s custom drawing colour settings (defined by their document properties drafting standard and any manually applied colours) and the set of colours defined in Options > System Settings > Colors.
Significantly different to reading the tooltip? No, but hopefully a little more understandable…
We hope you found that useful!
Have you seen our blog archive where we have posted plenty of helpful articles? We also have a fantastic video library filled with easy-to-follow videos on a number of topics inspired by other SOLIDWORKS users – take a look.
Also, don’t forget to follow us on twitter for daily bite size SOLIDWORKS tips, tricks and videos.


