
Sketching the Lobster Back
We’ll begin by creating some reference geometry on the front plane. I need a circle, this represents the centreline of the arc the lobster back will run through. I’ll place down a horizontal line, this represents the start point of my lobster back.
The lobster back will form the arc in 18-degree segments. I am going to create a centre line at an angle of 9 degrees to the horizontal, which is half the segment angle. We’ll now exit the sketch. I’ll create a new plane perpendicular to the front plane and coincident with the angled line.
I’ll open a sketch on the new plane and draw the cross-sectional profile of the lobster back. This is a 75 diameter circle. We need to create the welded seam now. To do this I’ll draw a smaller circle, 2mm in diameter at the intersection. We’ll turn that into construction geometry and use the trim entities tool to remove the overlapping region.
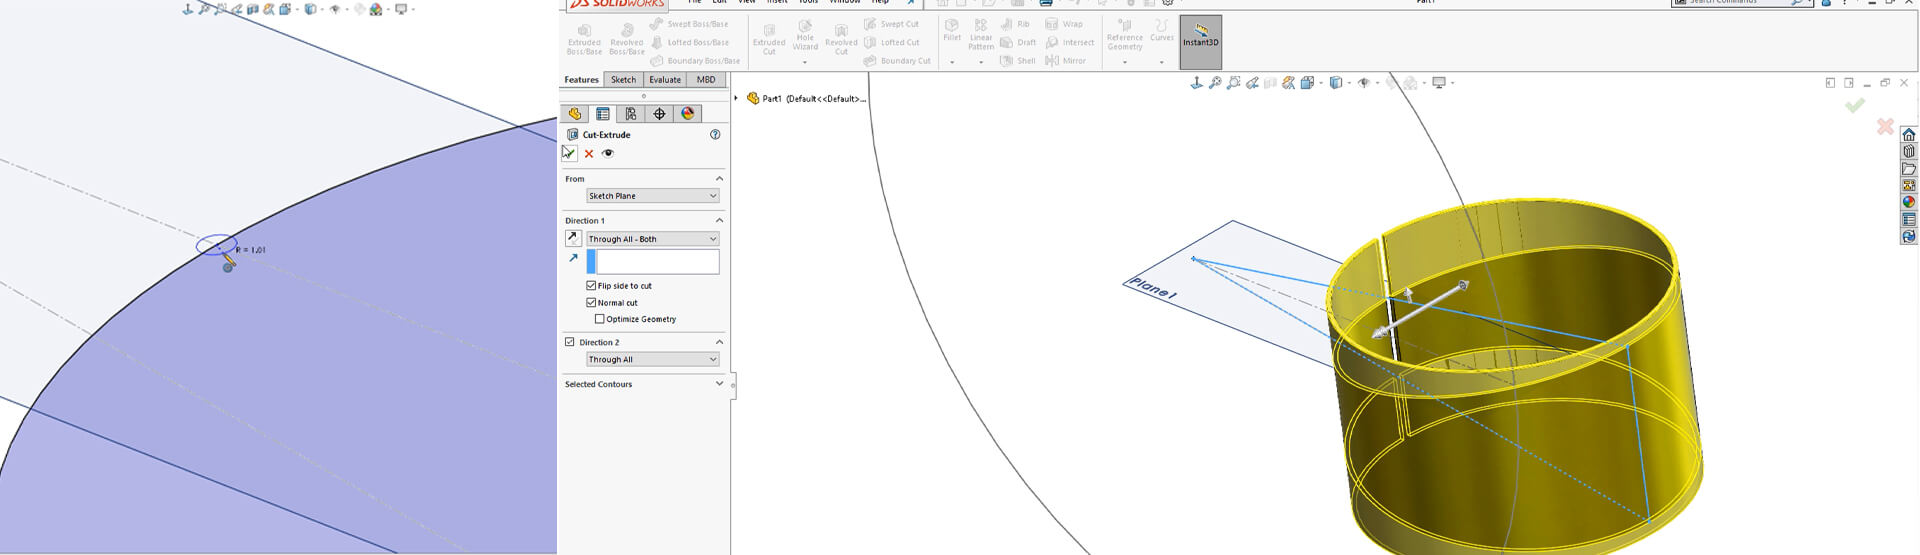
Next up, we need to turn our circle into a Sheet Metal base flange. We’ll extrude it mid-plane and the length of the extrude needs to extend past the horizontal centre line. Now to cut this base flange to the correct shape: I’ll open a sketch on the front plane, convert the horizontal line into the previous sketch into this sketch and extend it to the silhouette edge of the solid. I’ll add in another angled line from the origin to the silhouette edge and close the sketch off. I’ll make the angle from the horizontal to the angled line 18 degrees, which is our segment size, and that’s our sketch done.
Now to launch the cut extrude tool. We want to extrude cut through all in both directions, but we want to cut everything on the outside of the sketch. I’ll use the flip side to cut tick box to do this. Press OK and the first segment of the lobster back is done and because it’s sheet metal, we can flatten it too.
Now we just need to pattern it.
Pattern the Lobster Back
You could save this away, bring it to an assembly and circular pattern it there, or we can create a multibody sheet metal part and pattern it in the part environment. We’ll create a multibody sheet metal part. In order for me to circular pattern it, I’ll need an axis to pattern about. I’ll create a new axis at the intersection of the right and top plane.
I’ll launch my circular pattern tool, pick my axis as the reference axis, and choose the solid as my body to pattern.
We’ll have 5 instances of the body at 18 degree spacing, hitting the green tick, and that’s our lobster back done!
We hope you found that useful!
Have you seen our blog archive where we have posted plenty of helpful articles? We also have a fantastic video library filled with easy-to-follow videos on a number of topics inspired by other SOLIDWORKS users – take a look. Also, don’t forget to follow Innova Systems on Twitter for bite-size SOLIDWORKS tips, tricks, and videos.


